Block Ads on Every Device You Own with a $150 Raspberry Pi
In my last post, I wrote about how Tailscale holds my entire infrastructure together, a mesh VPN that lets all my devices talk to each other no matter where I am. I mentioned I was running AdGuard Home on a Raspberry Pi as my DNS server, and that I'd write the setup guide for it.
This is that guide. By the end of it, you'll have a Raspberry Pi that blocks ads and trackers on every device you own, your phone, your laptop, your kid's tablet, your smart TV, without installing anything on any of them. And it works whether you're at home, at a coffee shop, or in a hotel room three states away.
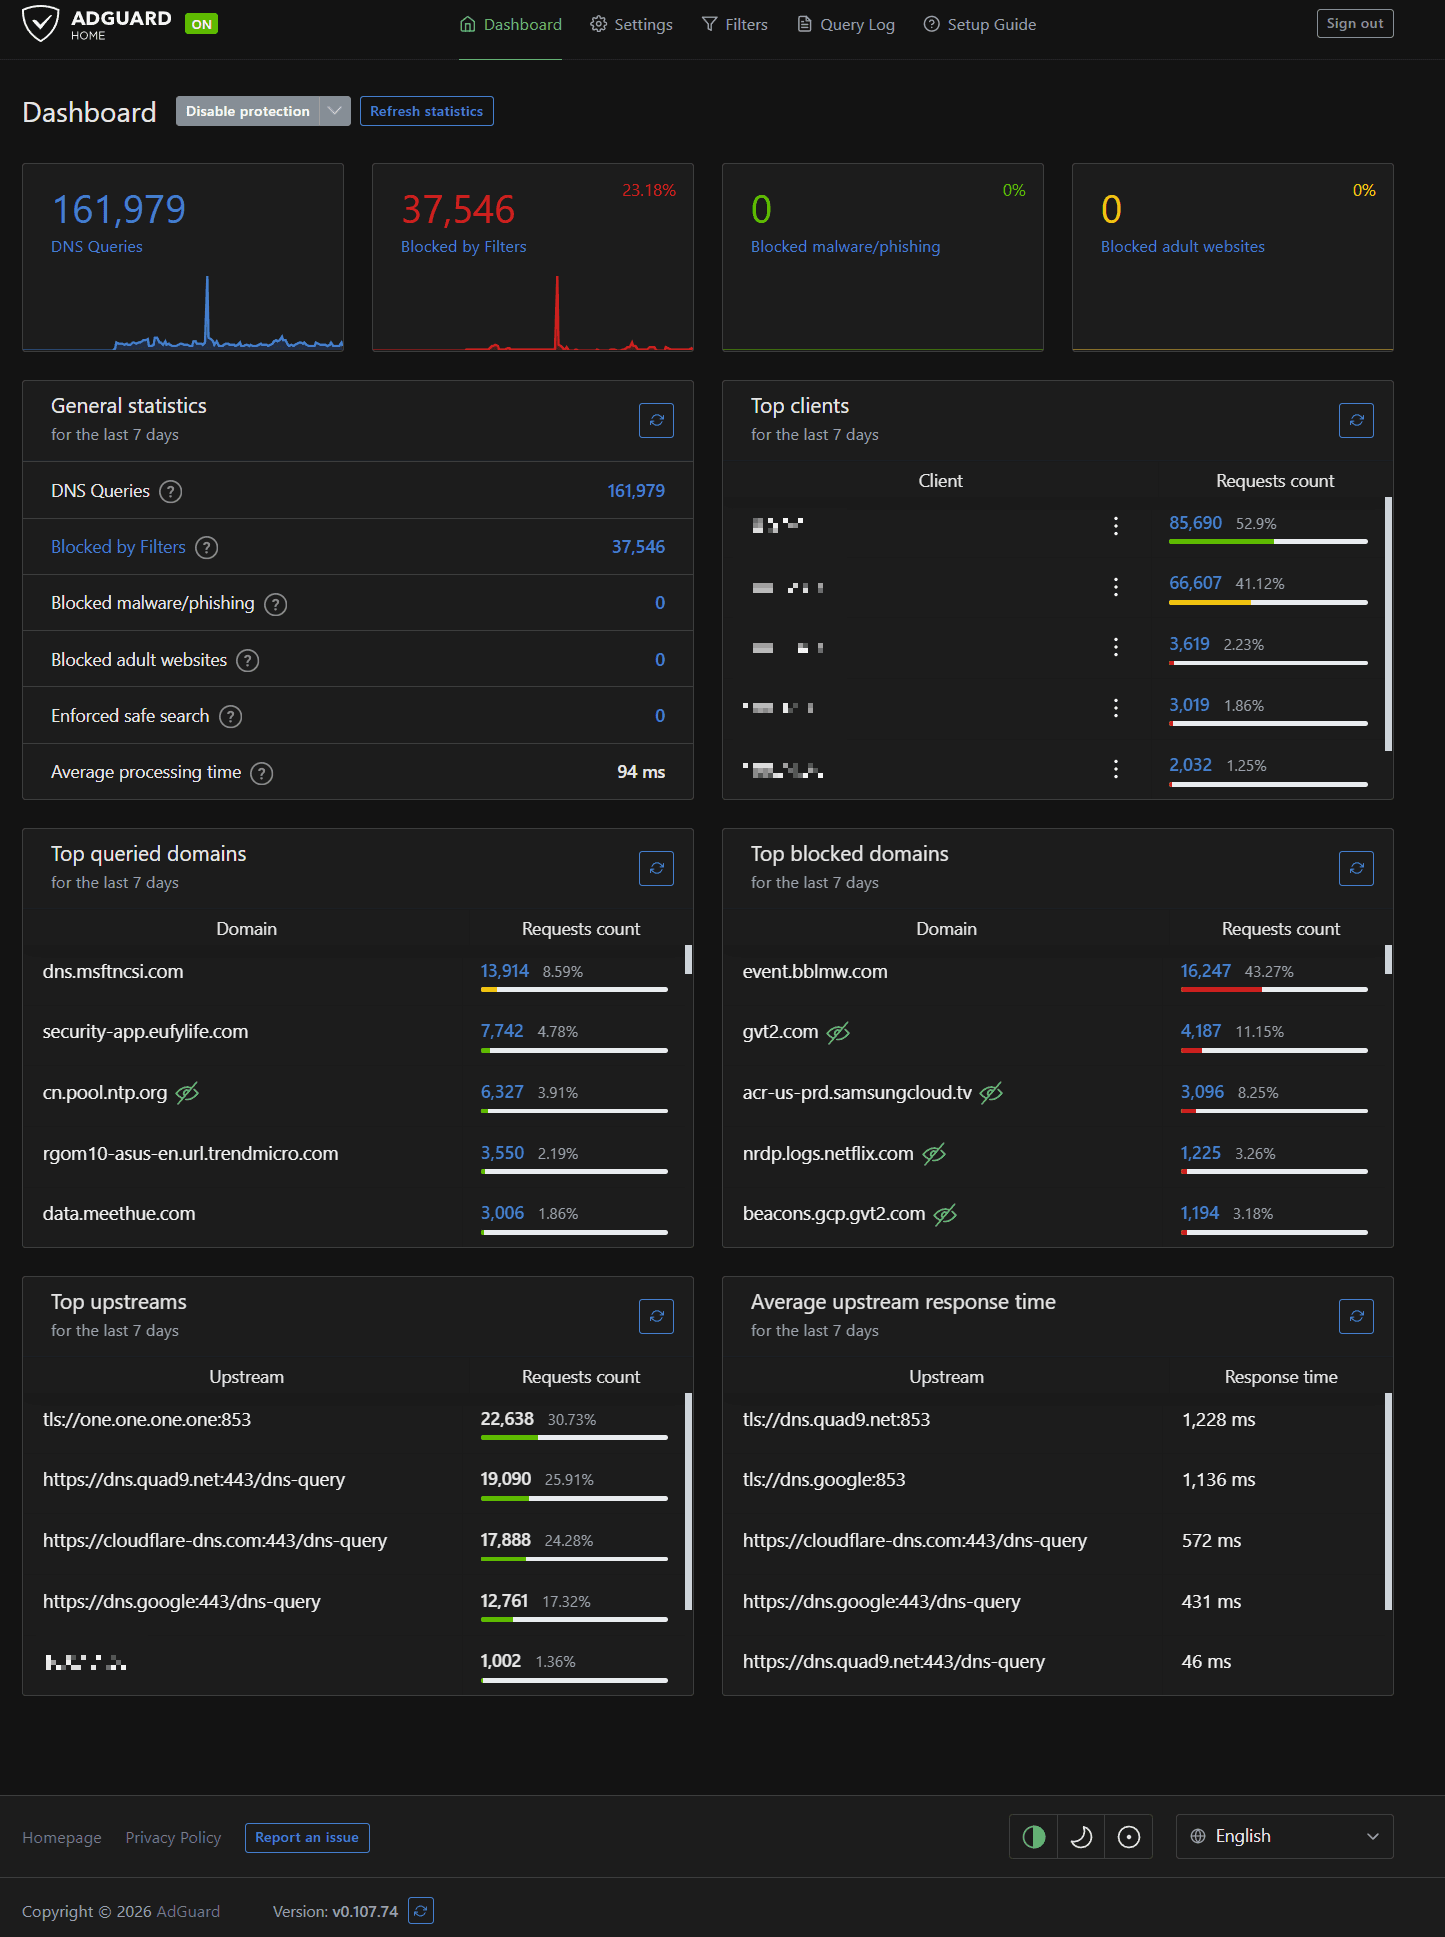
I've been running this exact setup for months. It blocks about 23% of the DNS queries on my network. That's not 23% of my browsing. That's nearly a quarter of all the traffic my devices generate behind the scenes. Telemetry, tracking pixels, ad networks, analytics beacons. Stuff you never asked for and never see, just quietly phoning home on every device you own. Gone.
What We're Building
Here's the setup in plain terms: a Raspberry Pi sitting on your shelf at home, running two pieces of software.
AdGuard Home is a DNS server. When any device on your network tries to load a webpage, it asks a DNS server "what's the IP address for this domain?" AdGuard Home answers that question. But if the domain is on a blocklist (ad servers, trackers, telemetry endpoints), it just says "doesn't exist." The ad never loads. The tracker never fires. No browser extension needed, no app to install, no per-device configuration.
Tailscale is a mesh VPN that connects all your devices into a private encrypted network. It's what makes AdGuard Home work everywhere, not just at home. Your phone at the airport, your laptop at a client's office: they all use the Pi for DNS, no matter where they are.
Together, they give you three things:
Network-wide ad blocking. Every device on your network gets filtered DNS automatically. Smart TVs that don't support ad blockers? Covered. IoT devices phoning home to Amazon? Blocked. Your kid's iPad loading tracking scripts on every webpage? Handled.
Encrypted DNS everywhere. Your DNS queries go through encrypted channels (DNS-over-HTTPS and DNS-over-TLS) to privacy-respecting upstream providers. Your ISP can't see what domains you're resolving. Nobody between you and the upstream DNS server can snoop on your lookups.
A personal VPN exit node. When you're on sketchy public WiFi, you can route all your traffic through the Pi at home. The coffee shop's router sees nothing but encrypted WireGuard traffic. Your browsing goes out through your home internet connection, with full ad blocking, as if you never left the house.
How the Encryption Works
This part matters, so let me explain it without making it complicated.
Tailscale is built on WireGuard, which is an encryption protocol. When two devices join your Tailscale network, they exchange cryptographic keys. After that, everything between them travels through an encrypted tunnel. Not some of it. All of it.
Here's what that looks like in practice. Say you're at a coffee shop and you've set your Pi as your Tailscale exit node:
- You type a URL into your browser
- Your laptop encrypts that request and sends it through the WireGuard tunnel to your Pi at home
- The coffee shop's WiFi router sees encrypted gibberish. It has no idea what you're doing
- Your Pi decrypts the request, checks AdGuard Home (blocks any ad/tracker domains), and forwards the clean request to the internet through your home connection
- The response comes back the same way, encrypted through the tunnel to your laptop
The critical thing: this is peer-to-peer. Your traffic doesn't route through Tailscale's servers. It goes directly between your devices through an encrypted tunnel. Tailscale coordinates the connection (helps your devices find each other), but the actual data never touches their infrastructure.
Compare that to a commercial VPN where you're paying $10/month to route all your traffic through their servers, trusting them not to log it. With this setup, the only infrastructure involved is yours.
What You'll Need
Hardware:
- Raspberry Pi 4 (4GB), about $120
- High-endurance microSD card (32GB or 64GB), about $30
- Official Pi power supply (USB-C, 5V/3A), about $10-15
- Case (optional but recommended), about $10
- Ethernet cable, use what you've got
Total: roughly $150-170. That's less than a year of most commercial VPN subscriptions, and you own the hardware forever.
A note on the SD card: get a high-endurance card, not a standard one. AdGuard Home writes to the disk constantly: query logs, stats, blocklist updates. A regular SD card will die in months. I learned this the hard way. The SanDisk Max Endurance or Samsung PRO Endurance are both solid picks. Spend the extra $15 now and don't think about it again.
Software (all free):
- Raspberry Pi OS Lite (no desktop needed, this thing runs headless)
- Tailscale (free tier covers up to 100 devices)
- AdGuard Home (free and open source)
You'll also need:
- A computer to flash the SD card
- Another device already on Tailscale (to verify things are working)
- About an hour
Flash Raspberry Pi OS Lite
Download and install the Raspberry Pi Imager from raspberrypi.com on your computer. Insert your SD card and open the Imager.
- Click Choose Device and select Raspberry Pi 4
- Click Choose OS, scroll to Raspberry Pi OS (other), and select Raspberry Pi OS Lite (64-bit). You don't need a desktop environment for this
- Click Choose Storage and select your SD card
- Click the gear icon (or hit Ctrl+Shift+X) to open the advanced settings:
- Set a hostname (something like
dns01orpiholeor whatever you want) - Enable SSH (password authentication is fine for now)
- Set a username and password. Pick something strong, this will be accessible on your network
- Configure your WiFi if you're not using ethernet (ethernet is better for a DNS server: more reliable, lower latency)
- Set your locale and timezone
- Set a hostname (something like
- Click Save, then Write
Once it's done, pop the card into your Pi, plug in ethernet and power, and give it about 60 seconds to boot.
Find Your Pi and SSH In
You need to find your Pi's IP address on your local network. Check your router's admin page (usually at 192.168.1.1) and look for the hostname you set. It'll be something like 192.168.1.100.
SSH in from your computer. Use the username you set in the Imager's advanced settings:
ssh your-username@192.168.1.100
First thing, update everything:
sudo apt update && sudo apt upgrade -y
Set a Static IP
Your Pi needs a consistent IP address. If your router hands it a different IP via DHCP tomorrow, your DNS setup breaks.
The best approach is a DHCP reservation in your router. Go into your router's admin, find the Pi, and tell the router to always assign it the same IP. Every router does this differently, but it's usually under LAN settings or DHCP settings.
If your router doesn't support DHCP reservations, you can set a static IP directly on the Pi by editing /etc/dhcpcd.conf:
sudo nano /etc/dhcpcd.conf
Add these lines at the bottom (adjust for your network):
interface eth0
static ip_address=192.168.1.100/24
static routers=192.168.1.1
static domain_name_servers=1.1.1.1 9.9.9.9
Save and reboot:
sudo reboot
SSH back in after it comes back up.
Install Tailscale
This is a one-liner. Tailscale provides an install script for Linux:
curl -fsSL https://tailscale.com/install.sh | sh
Once installed, bring it up with subnet routing and exit node enabled:
sudo tailscale up --advertise-routes=192.168.1.0/24 --advertise-exit-node
This does two things:
--advertise-routes=192.168.1.0/24tells Tailscale this Pi can route traffic to your local network (adjust the subnet to match yours)--advertise-exit-nodemakes the Pi available as an exit node, so you can route all your internet traffic through it when you're away from home
You'll get a URL to authenticate. Open it in a browser on another device, log in to your Tailscale account (or create one, free tier is fine), and approve the device.
Important: the subnet routes and exit node need to be approved in the Tailscale admin console. We'll do that in a later step.
After authentication, verify it's connected:
tailscale status
You should see your Pi listed with its Tailscale IP (something in the 100.x.x.x range). Note this IP. You'll need it later.
Enable IP Forwarding
For the subnet router and exit node to work, the Pi needs to forward IP packets:
echo 'net.ipv4.ip_forward = 1' | sudo tee -a /etc/sysctl.d/99-tailscale.conf
echo 'net.ipv6.conf.all.forwarding = 1' | sudo tee -a /etc/sysctl.d/99-tailscale.conf
sudo sysctl -p /etc/sysctl.d/99-tailscale.conf
Install AdGuard Home
Also a one-liner:
curl -s -S -L https://raw.githubusercontent.com/AdguardTeam/AdGuardHome/master/scripts/install.sh | sh -s -- -v
This downloads the latest release, installs it, and sets it up as a systemd service that starts automatically on boot.
Once the install finishes, it'll tell you to open the setup wizard in your browser:
http://192.168.1.100:3000
Open that URL from any device on your local network.
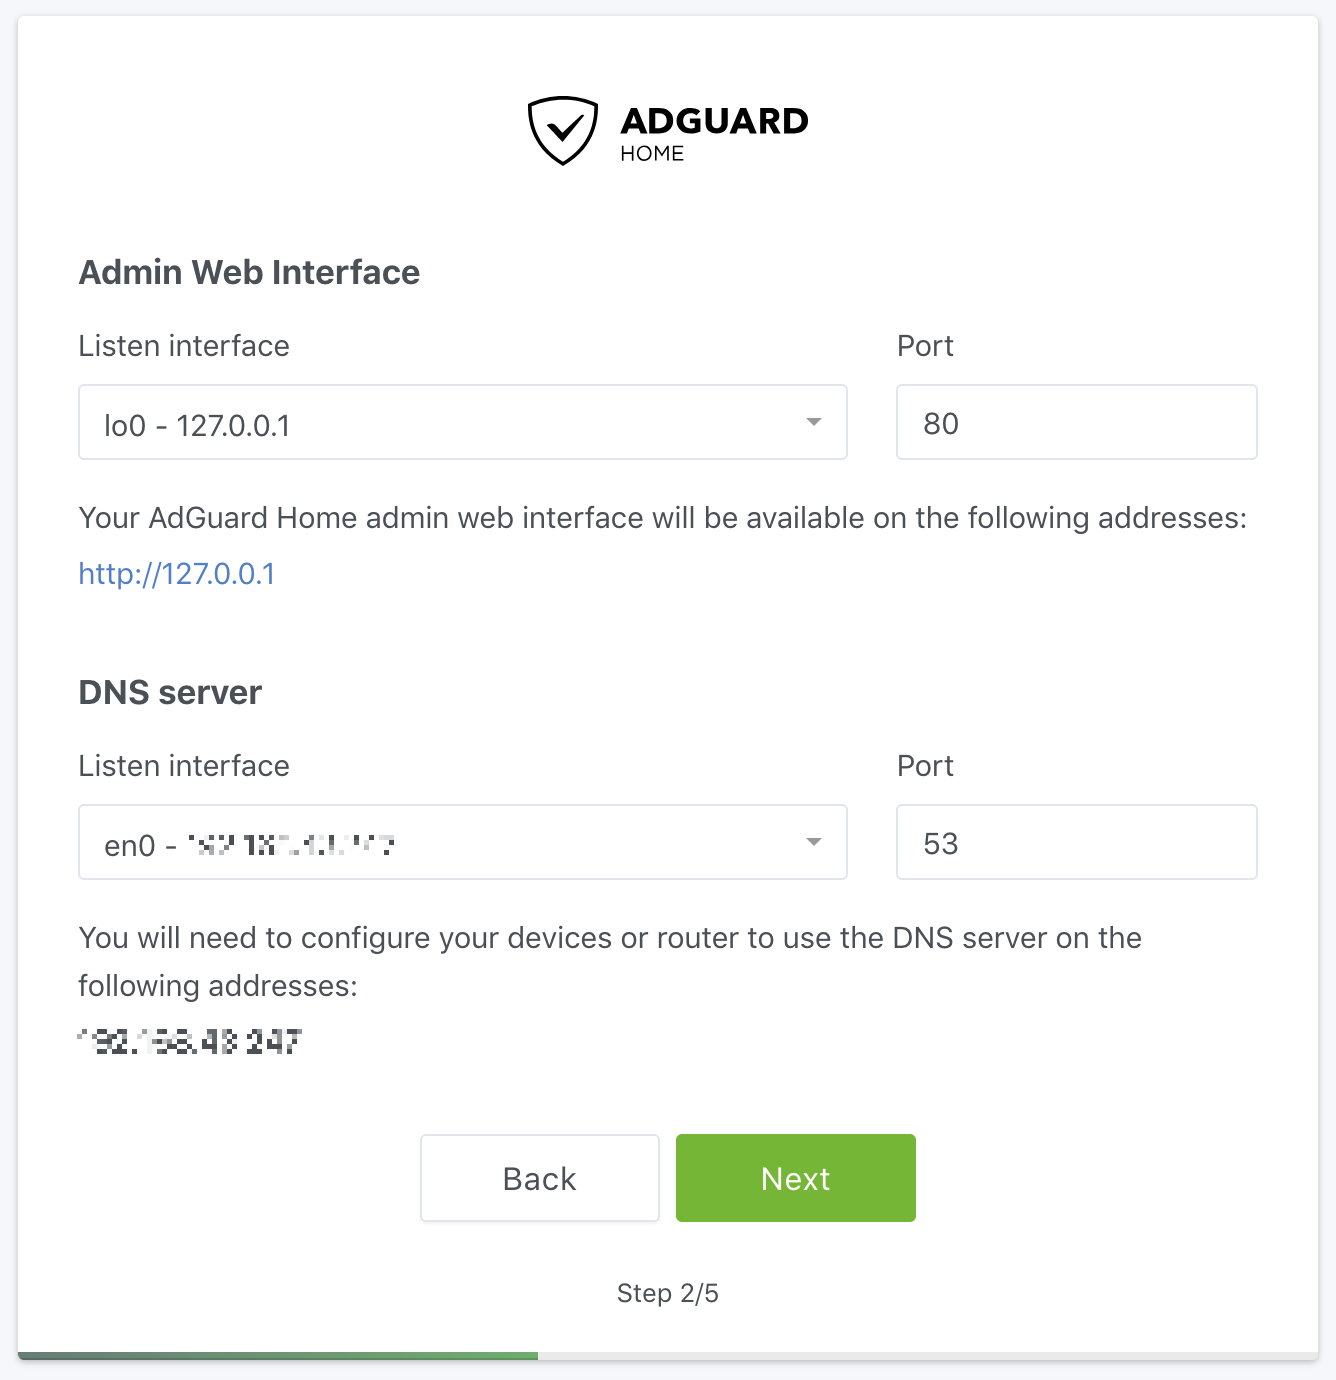
Walk Through the Setup Wizard
Step 1: Listen interfaces. Set the web admin interface to your Pi's IP (192.168.1.100) on port 80. Set the DNS server to listen on all interfaces, port 53.
Step 2: Admin credentials. Pick a username and strong password. This is what you'll use to log into the AdGuard dashboard.
Step 3: Device configuration. This page shows you how to point devices at your new DNS server. We're going to handle this through Tailscale instead of manually configuring each device, so you can skip ahead for now.
Step 4: Done. Click Open Dashboard and log in.

Configure AdGuard Home
Out of the box, AdGuard Home works. But the default settings aren't optimized. Here's what I run and why.
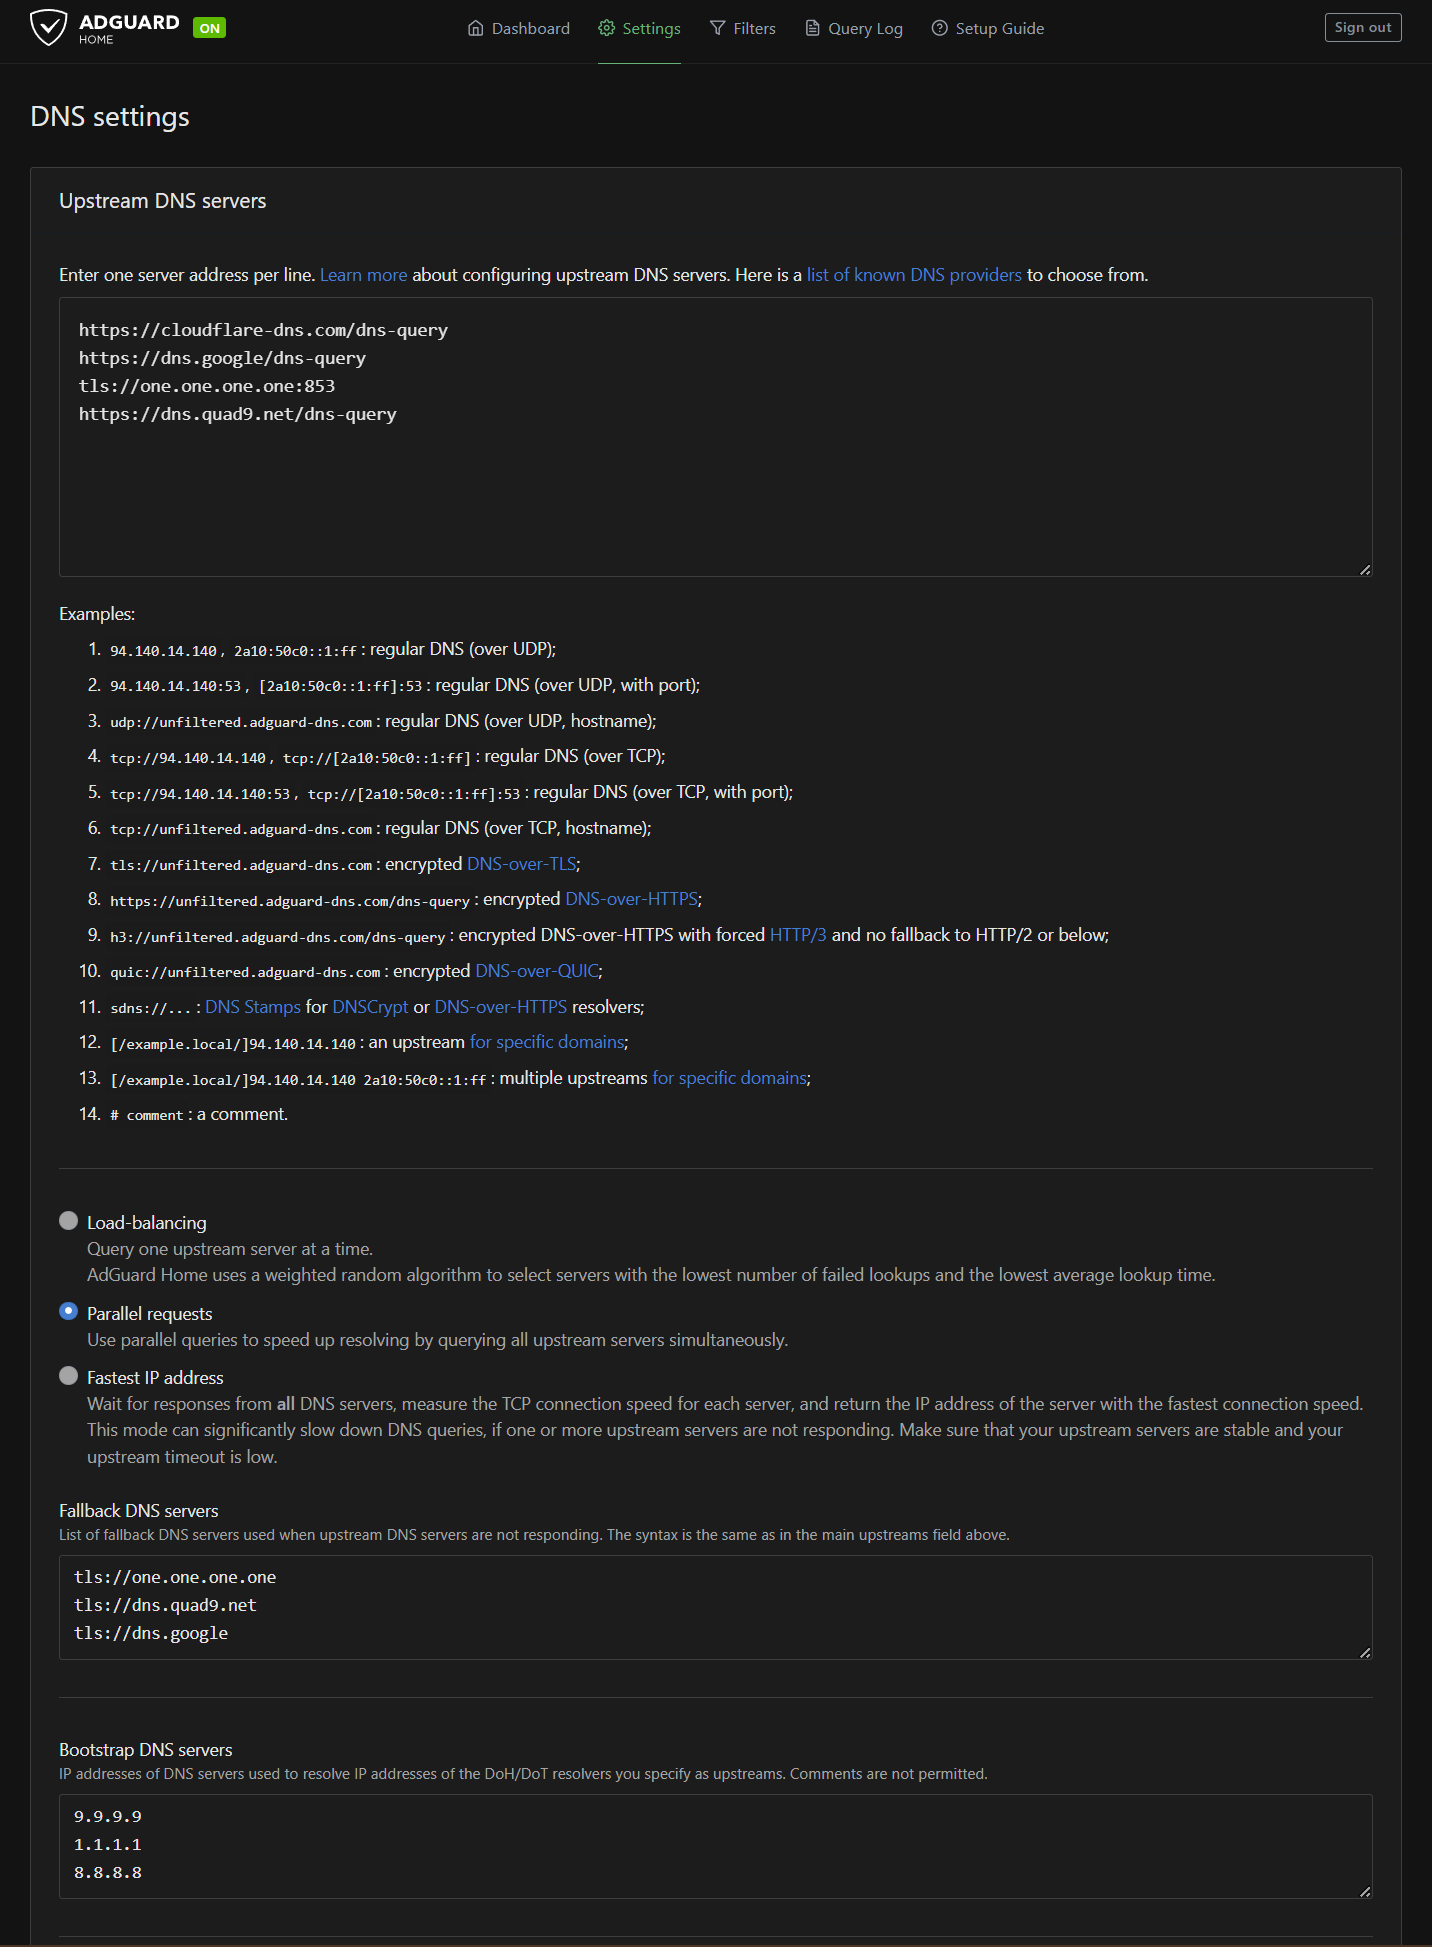
Upstream DNS Servers
Go to Settings, then DNS settings. Under Upstream DNS servers, replace whatever's there with:
https://cloudflare-dns.com/dns-query
https://dns.google/dns-query
tls://one.one.one.one:853
https://dns.quad9.net/dns-query
These are encrypted DNS providers: two using DNS-over-HTTPS (DoH) and one using DNS-over-TLS (DoT). Your DNS lookups are encrypted between the Pi and these providers. Your ISP can't see what domains you're resolving.
Set the mode to Parallel requests. This fires your query to all four upstreams simultaneously and takes whoever answers first. Fastest response wins every time.
Fallback DNS Servers
Under Fallback DNS servers, add:
tls://one.one.one.one
tls://dns.quad9.net
tls://dns.google
These kick in if all your primary upstreams fail. All DoT, all encrypted.
Bootstrap DNS Servers
Under Bootstrap DNS servers, add:
9.9.9.9
1.1.1.1
8.8.8.8
Bootstrap servers resolve the hostnames of your upstream DNS providers. It's a chicken-and-egg problem. You need DNS to resolve cloudflare-dns.com before you can use Cloudflare as your DNS. Bootstrap handles that initial lookup using plain IP addresses.
Other Settings to Tweak
While you're in the DNS settings:
- Private reverse DNS servers: Enable, and set your router IP (192.168.1.1). This lets AdGuard resolve local hostnames on your network.
- Disable IPv6 resolution: If you're not using IPv6 on your network (most home networks aren't), disable it. Skipping the dual-stack lookup cuts latency.
- Cache size: Bump it up to 16MB. The default is small. A bigger cache means fewer upstream lookups and faster repeat visits to sites you use regularly.
- Minimum TTL override: Set to 300 seconds. This pins short-TTL responses in cache longer, so domains that set aggressive 30-second TTLs don't cause a flood of upstream queries.
- Query log retention: I'd set this to 7 days instead of the default 90. AdGuard writes to the SD card every time it logs a query. Less retention = less disk wear = longer card life.
Blocklists
Go to Filters, then DNS Blocklists. The AdGuard DNS filter (about 162K rules) is enabled by default and does a solid job out of the box. If you want more aggressive blocking, you can add additional lists, but start with the default and see how it goes. You can always add more later if ads are slipping through.
Docker Alternative
If you're more comfortable with Docker and prefer running AdGuard in a container, you can skip the native install above and use Docker Compose instead. Install Docker first:
curl -fsSL https://get.docker.com | sh
sudo usermod -aG docker $USER
Log out and back in, then create a docker-compose.yml:
services:
  adguardhome:
    image: adguard/adguardhome
    container_name: adguardhome
    restart: unless-stopped
    ports:
      - "53:53/tcp"
      - "53:53/udp"
      - "80:80/tcp"
      - "3000:3000/tcp"
    volumes:
      - ./adguard/work:/opt/adguardhome/work
      - ./adguard/conf:/opt/adguardhome/conf
Run it:
docker compose up -d
Same setup wizard at http://192.168.1.100:3000, same configuration steps. The Docker approach makes updates cleaner (docker compose pull && docker compose up -d) and keeps AdGuard isolated from the rest of the system. Either way works. Pick whichever you're more comfortable with.
Configure Tailscale (The Part That Makes It All Work)
This is where the magic happens. Everything so far gave you a Pi running AdGuard Home on your local network. This step makes it work on every device, everywhere.
Log in to the Tailscale admin console at login.tailscale.com/admin.
Approve Subnet Routes
Find your Pi in the Machines list. Click the three-dot menu and go to Edit route settings. You'll see the subnet route you advertised (192.168.1.0/24). Toggle it on.
This lets other devices on your Tailscale network reach things on your home LAN through the Pi.
Approve Exit Node
Same menu. You'll see an Exit Node toggle. Turn it on.
Now any device on your Tailscale network can route all its internet traffic through the Pi. When you're on public WiFi, flip this on and your traffic goes through your home connection instead of the coffee shop's router.
Set the Pi as Your Tailnet DNS Server
This is the key step. Go to the DNS page in the Tailscale admin console.
- Under Nameservers, click Add nameserver, then Custom
- Enter your Pi's Tailscale IP (the 100.x.x.x address you noted earlier)
- Enable "Override local DNS". This is critical. It tells every device on your Tailscale network to use only the Pi for DNS, ignoring whatever DNS the local network provides.
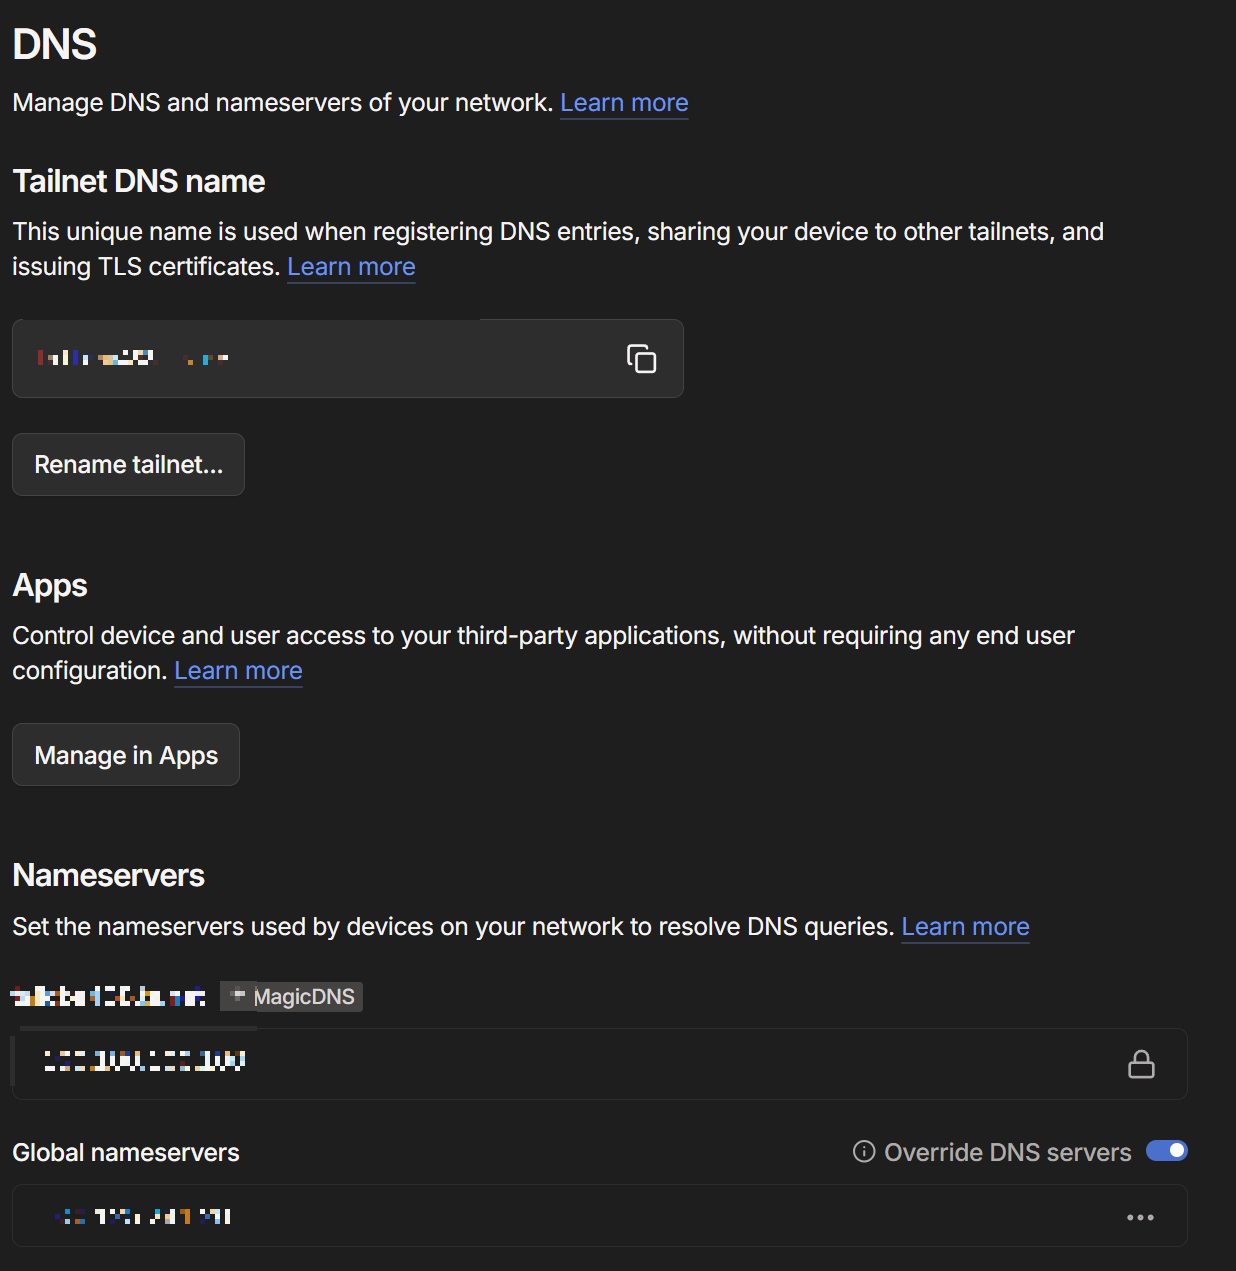
With this enabled, every device running Tailscale uses your Pi for DNS resolution, which means AdGuard Home filters every query, on every device, everywhere.
Disable Key Expiry
By default, Tailscale keys expire after 180 days, which means your Pi would drop off the network and you'd have to re-authenticate. For a headless server that should stay connected permanently:
Find your Pi in the Machines list, click the three-dot menu, and select Disable key expiry.
This keeps the Pi connected permanently without periodic re-authentication.
Test It
Time to verify everything works.
At home: On your phone (with Tailscale enabled), go to any website that usually shows ads. They should be gone. Open the AdGuard Home dashboard and check the query log. You should see queries from your phone being filtered.
Away from home: Take your laptop to a coffee shop or use your phone's cellular data. Make sure Tailscale is connected. Browse around. Ads should still be blocked. If you enable the Pi as your exit node in the Tailscale app, all your traffic routes through home. Check whatismyip.com and you should see your home IP address.
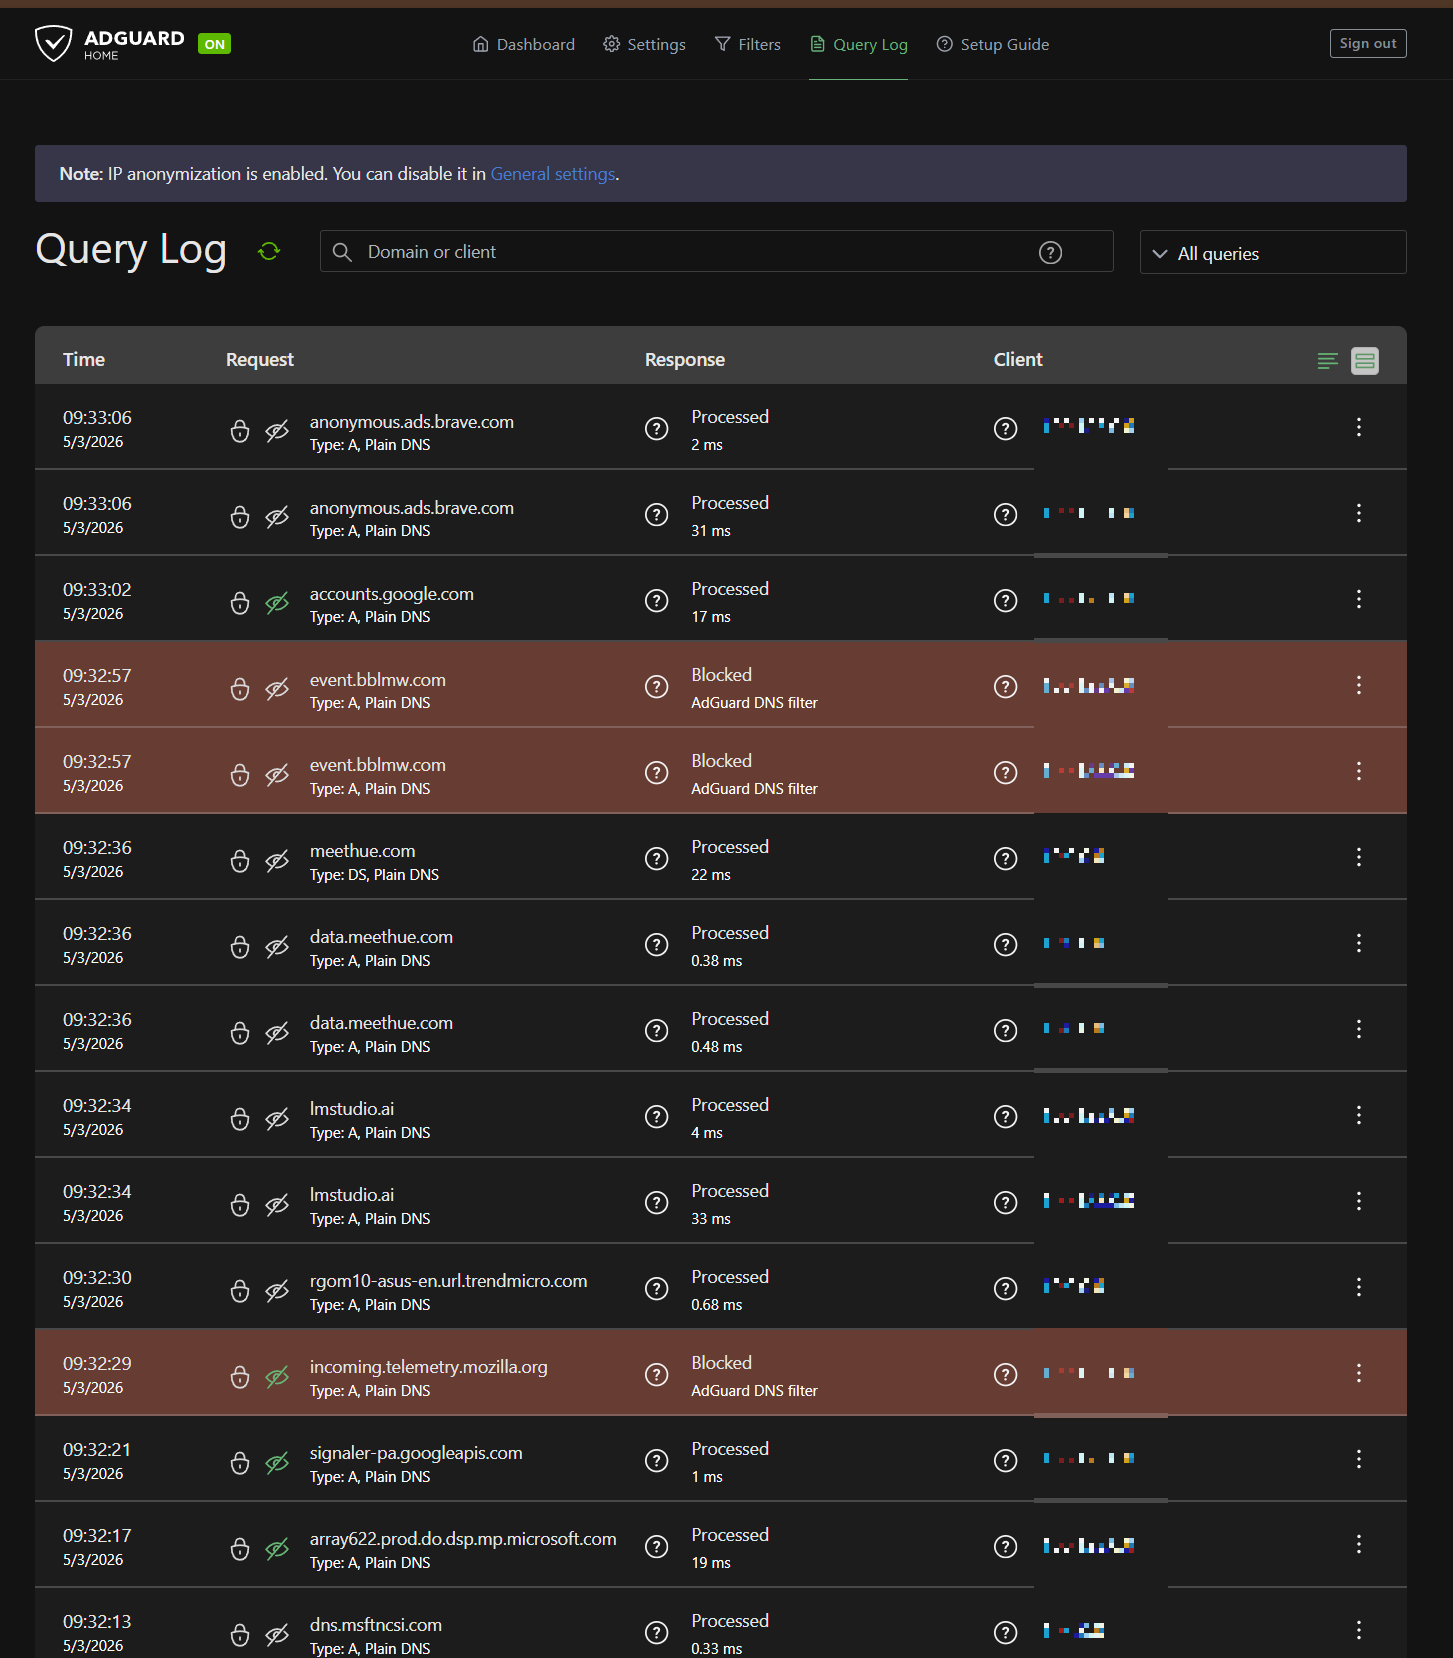
Check the stats: After running for a day or two, your AdGuard dashboard will show you exactly how much junk your network was generating. Most people are surprised at the percentage. When I first set this up, seeing that almost a quarter of my DNS traffic was ads and trackers was a wake-up call.
What You End Up With
For about $150 in hardware and about an hour of setup, you now have:
- Ad and tracker blocking on every device on your network, including devices that don't support browser extensions (smart TVs, IoT devices, phones, tablets)
- Encrypted DNS everywhere. Your ISP can't snoop on your DNS queries
- A personal VPN exit node you can flip on whenever you're on untrusted WiFi
- All of it running on a tiny, silent, low-power box on your shelf that costs pennies a year in electricity
No monthly subscription. No trusting a VPN provider with your traffic. No per-device configuration. One Pi, all devices, everywhere.
Coming Up
This is the second post in a series about the tools I use to run my business and control my own tech. Still on deck:
- Self-hosting with StartOS: running your own cloud storage, password manager, and more on a mini PC
- SearXNG: replacing Google search with something that doesn't track you
- 3D printing custom PC cases: because sometimes the right enclosure doesn't exist yet
I'm building these guides based on what people actually want to learn. If there's something specific you want to see, let me know.
And if you'd rather not set any of this up yourself, that's literally what I do for a living. I can build this whole setup for you, walk you through it, or just point you in the right direction. Give me a call at (719) 838-0435 or check out barnstormit.com.
Need help with something mentioned in this post?
Call (719) 838-0435